Hi guys! I am sandyy. I'm going to show you simple 3D shapes in photoshop. 3D is a 3 dimentions describes an image that provides the perception of depth. When 3-D images are made interactive so that users feel involved with the scene, the experience is called virtual reality. . Photoshop is one of the best platform for editing images such as fictional design, graphic design, banners etc. So let's start!
How to make 3D shapes using tools in Photoshop
1. First and for most open your Photoshop. I'm currently using cs6 version because it is compatible on laptop's specs. If you dont have a Photoshop you can
download it on here.
2. After that, we have to create a layer that's where our shapes will be place. On the upper left side of Photoshop you could see the label File you have to click that and then select the New Layer right below in it or press CTRL + n shortcut key. After you selected that this will be the next to show on your screen. See pics below. This is where we adjust the layer to where we are contented. Well, depends on how you change that but I recommend this for tutorial.
3. Now, we already create our new layer but then we still not able to put our shapes here because simply the layer is lock. On the right side you could see our newly created layer is lock, notice that lock image beside on it. Simply double click that layer and then select OK. We can now create shape through
this.
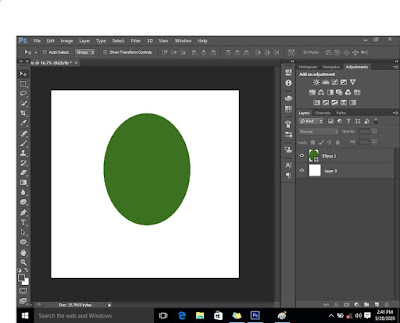
4. On the left side of the screen you can observed that these are the important tools in this platform. This is what we need to create a 3D shapes. For this tutorial I'm going to create a egg ball. Press right click to that rectangular image below then select Ellipse tool.To change the color there a color fill when you click a certain shape on the upper part of the screen. Simply click and then you can navigate your color chosen.
5. Next, create your own shape in that white form. Hold down your mouse to make a size and length of your shape. To make a perfect circle just press SHIFT key. Now we already have a 2D shape.
6. Next, we have to rasterize our shape so that we can able to create a shadow below in it and then highlight on the upper. To do this, press right click layer ellipse 1 then selected Rasterize layer . Now we can start to make a 3d shape.
7. Let's go back to the tool on the left of the screen. Select Burn tool. Now, select Ellipse 1 because that the layer where our shape was place. On top of the screen, you can adjust the hardness of the burn tool. Please be mindful on the chosen brush because sometimes its not really look natural (depends of your design) I choose these...
8. Shade now below the circular shape of the layer. Hold your mouse and burn it as much as you desire.
9. Let's now proceed for the highlight part. Same as the process of the burn tool you can able to see Dodge Tool above on the burn tool itself wherein it is used to highlight or to boost its color make it vibrant. Select dodge tool and then dodge the upper part of the shape like coloring on a paper.
REMINDER: When you are trying to make change or editing please check out the layer because that is where the selected pile you wanna make change.
10. We are almost done. Next is creating a depth to our shape to emphasize thats really necessary making somewhat illusion to our viewers. We are indeed make a shadow underneath. Simply copy Ellipse 1 by mouse right click then select Duplicate Layer . Name the copied layer into Black, mouse right click then choose Rename. Afterwards, we need to change the color into Black since that is our shadow layer. To do that, click the Paint Bucket Tool then choose a color below on the tools simply click it and choose black. Click the Black layer then point the paint bucket arrow to the desire shape and click it.
11. This is the final step, we have to transform the copied shape and place under the original shape of it. To do this, press CTRL + t then drag the middle point downward and when you are satisfies simply press enter. Next, drag it down using our move tool, the first tool on screen or simply use down and up arrow key. We're done!
Hope you guys learned from my tutorial. Thank you!


0 comments